Common Connection Errors / Solutions Error LGN2 The LGN2 error can have several causes. Most of the time this error can be easily resolved by rebooting your computer. Simply turn your computer off completely and then back on again. If you continue to receive this error, then the information below should help you to identify and resolve this issue. Let our new Connection Wizard pinpoint your problem! The Juno Connection Wizard is our newest help tool. Download it today to identify and resolve many common issues that may prevent you from successfully connecting to the Internet. To use the Juno Connection Wizard, you will need to have a Windows Operating System (other than Windows NT) running on your computer. If you cannot download the Juno Connection Wizard from your computer, simply download it onto a diskette from any computer with Internet access and then install it on the computer you would like to fix. Click here to download the Connection Wizard. |
A. Have you tried another access number? Your connection may have been dropped due to technical difficulties with the access number you are using. Try connecting to Juno again. If the problem persists, try using another access number in your area. For instructions on how to change your access number, please click here.
B. Remove the Juno Dial-Up Networking connectoid If the steps above did not resolve the issue, please follow the steps below to remove the Juno Dial-Up Networking connectoid. The connectoid will be recreated the next time you log on to Juno. - Double-click the My Computer icon on your desktop.
- Double-click the Dial-Up Networking icon.
- Click once on the Juno icon to highlight it.
- From the File menu, select Delete.
- Try logging on to Juno again.
C. Verify Network Settings If the problem persists, follow the steps below to verify your network settings. - Click on the Windows Start button, point to Settings and select Control Panel.
- Double-click the Network icon.
- Check to see if you have the following components:
Client For Microsoft Networks
TCP/IP or TCP/IP > Dial Up Adapter
Dial-Up Adapter.
Note: If you are on a Network or company LAN, contact your system administrator before making any network changes. If the components listed above are not present, then add the missing component(s). IMPORTANT! Only add a component if it is not already present. If the component is listed, you will not need to add it. To Add Client for Microsoft Networks: 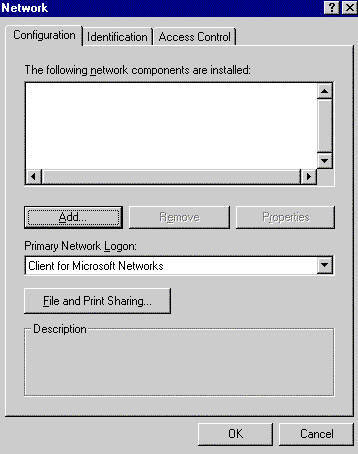 - Click on the Add button.
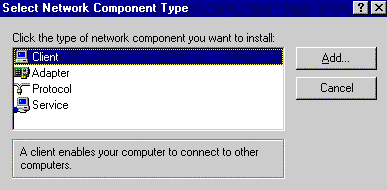 - Select Client.
- Click on the Add button.
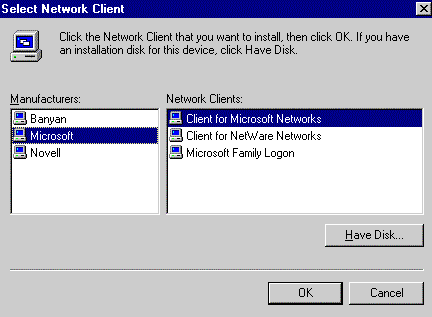 - Under Manufacturers, select Microsoft.
- Under Network Clients, select Client for Microsoft Networks.
- Click OK.
To Add Dial-up Adapter: - Click on the Add button.
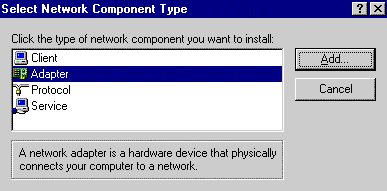 - Select Adapter.
- Click on the Add button.
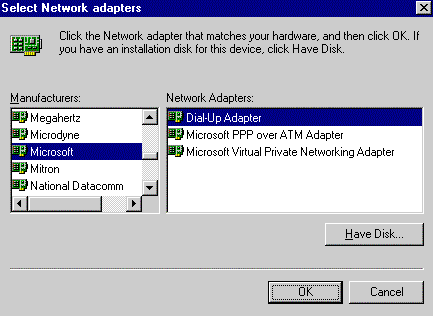 - Under Manufacturers, select Microsoft.
- Under Network Adapters, select Dial-Up Adapter.
- Click OK.
To Add TCP/IP: - Click on the Add button.
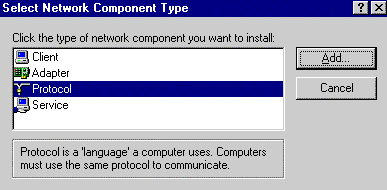 - Select Protocol.
- Click on the Add button.
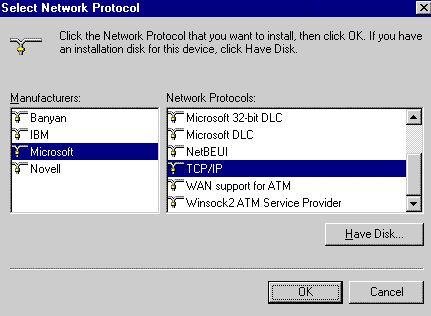 - Under Manufacturers, select Microsoft.
- Under Network Protocols, select TCP/IP.
- Click OK.
Once you've added any necessary components, follow the steps below. - Click once on TCP/IP to highlight it and click on the Properties button.
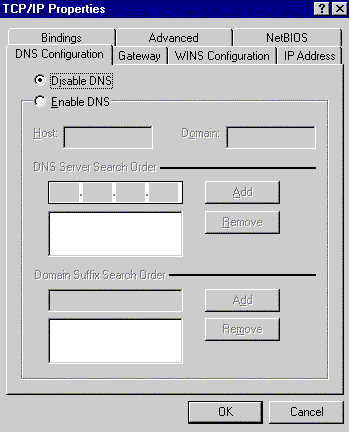 - Select the DNS Configuration tab and ensure that Disable DNS is checked.
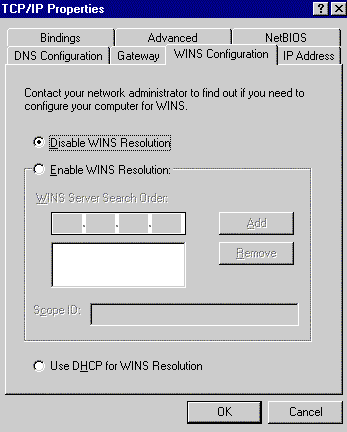 - Select the WINS Configuration tab and make sure that Disable WINS Resolution is checked.
- Click OK.
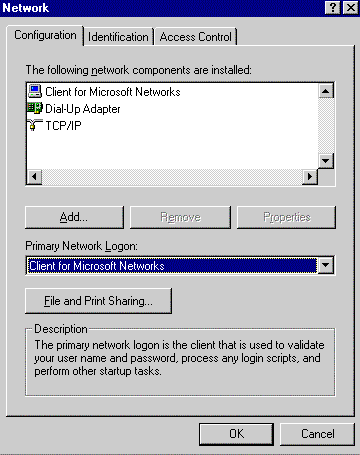 - In the Primary Network Logon field, ensure that Client for Microsoft Networks is selected.
- Click OK.
- Click on Dial-up Adapter once to highlight it.
- Click on the Properties button.
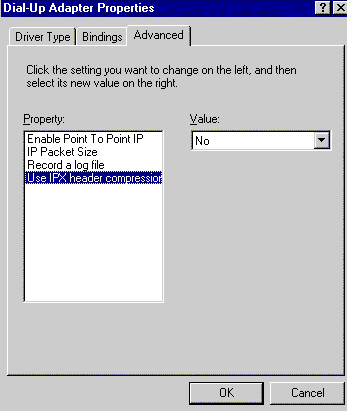 - Select the Advanced tab and click once on Use IPX Header Compression to highlight it.
- Under the Value drop-down menu, select NO.
- Click OK and OK again.
- When you are prompted to restart you computer, click YES.
Windows 98 Users:Check to see that Dial-Up Networking is installed on your computer by following these steps: - On your desktop, double-click the My Computer icon .
- If you see a Dial-Up Networking icon, Dial-Up Networking is installed. Close My Computer and try logging on to Juno again by double-clicking on the Juno icon on your Desktop.
- If you do not see a Dial-Up Networking icon, close My Computer, then click on the Windows Start button, point to Settings and select Control Panel.
- Double-click the Add/Remove Programs icon.
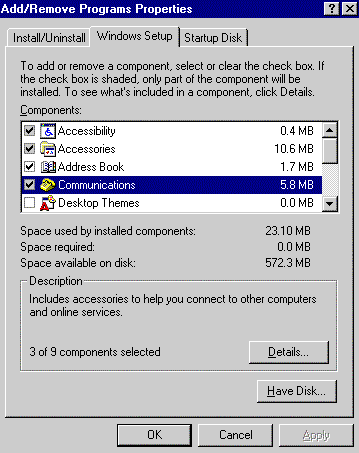 - Select the Windows Setup tab, and double-click on Communications.
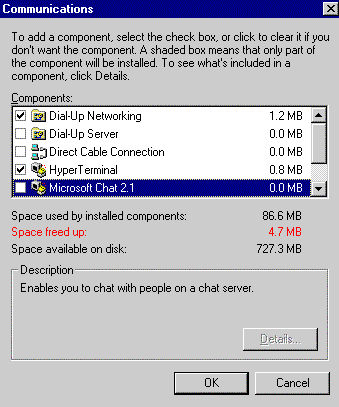 - Put a check in the box next to Dial-Up Networking, Hyperterminal and Phone Dialer.
- Click OK and click OK again to exit.
- Close the Control Panel and try logging on to Juno again.
Windows 95 Users:If you are running Windows 95, check to see what version you have. If you have an older version, you may need to download the latest version of Dial-Up Networking (version 1.3). To check what version of Windows 95 you are running, please follow these steps: - Click on the Windows Start button, point to Settings and select Control Panel.
- Double-click on the System icon and select the General tab.
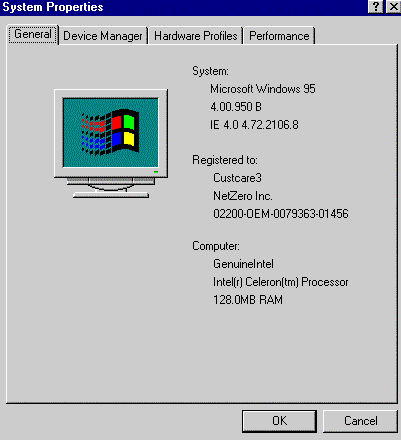 - Under System, you will see listed the Operating System, Edition and version number. The version number will start with 4.00.950. Check to see if a B or C is listed after 4.00.950. If not, you will need to download and install Dial-Up Networking 1.3.Click here to download it.
- If there is no letter at all after 4.00.950, then we suggest you also download and install Service Pack 1 for Windows 95. You can download it by clicking here.
Note: You will need to scroll down to the Service Packs section.
Once the Dial-Up Networking 1.3 upgrade or Windows 95 Service Pack has been installed, you will need to reinstall the Juno software. Before proceeding, ensure that you have the JunoSetup.exe file on your system or the Juno CD. You can download the latest version of our software from our Web site at http://www.juno.com. Once you have the Juno software, please follow the steps below to completely uninstall and reinstall Juno. - Click on the Windows Start button, point to Settings and select Control Panel.
- Double-click the Add/Remove Programs icon.
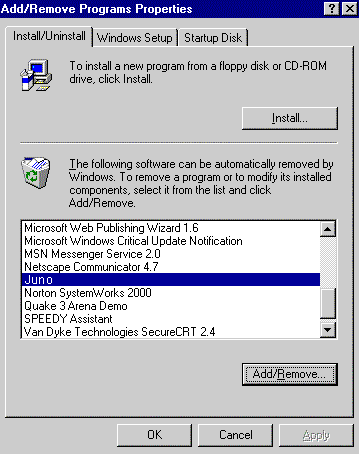 - Click once on Juno to highlight it and click on the Add/Remove button.
- Click OK then OK again and close the Control Panel.
- Click on the Windows Start button, point to Programs and select Windows Explorer.
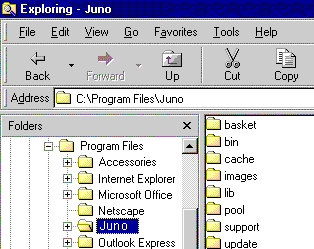 - In the left-side window, double-click the Program Files folder.
- Click once on the Juno folder to highlight it and press the Delete key on your keyboard to remove it.
- Close Windows Explorer.
- On your desktop, double-click the My Computer icon.
- Double-click the Dial-Up Networking icon.
- Click once on the Juno icon to highlight it and press the Delete key on your keyboard to remove it.
- Close all windows and restart your computer.
After the computer has restarted, reinstall the Juno software by inserting the Juno CD into your CD-ROM drive or by double-clicking on the JunoSetup.exe file that you downloaded.
To locate the JunoSetup.exe file using Windows 95/98, please follow the steps below. - Click the Windows Start button, point to Find and select Files or Folders.
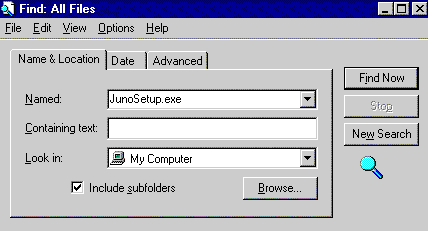 - In the Named field, type JunoSetup.exe
- Ensure that the Look in field indicates My Computer.
- Click on the Find now button.
- When the JunoSetup.exe file is found, double-click on it to run the installation program.
- When the installation is complete, retry your Juno connection.
| |


