Importing Contacts from a Custom .CSV file Note:If you're using Juno's new Message Center, please click here.
Email on the Web allows you to create a contacts file with fields of your choice. To import a custom contact file, it is important that to format and save as a '.csv' file. Spreadsheet programs like Microsoft Excel make it easy to create a CSV file. Currently, Email on the Web supports most of the common header fields. To view a complete list of supported header fields, please click here. If your file has a header field that is not supported by Email on the Web then it will not be imported. To import a custom CSV file into Email on the Web please follow the steps below: Step 1: To create a custom CSV file.
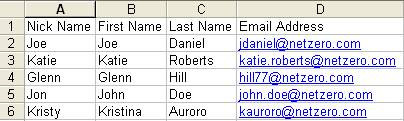
Step 2: Import contacts into Email on the Web. Step 1: To create a custom CSV file - Open Microsoft Excel or any other spreadsheet program.
- Enter the fields of your choice from the supported header fields in the top row or first line.
- Save the file as myaddressbook.csv
Note: The saved file should end in .csv . The various file extensions are available from the 'Save as type' drop-down.Step 2: Importing contacts into Email on the Web To Import contacts into please make sure that you are signed into your account before following these steps. - Click on the Address Book tab.
- Click on the Import link on the upper-right corner.
 - In the Import Contacts section, select the program to import your contacts from E.g. Outlook Express
 - Enter the path and filename you exported or click on Browse to locate the file on your computer.
- Click on Import.
Back to the Main Menu
| 


